Providing PERT Within Project Professional
PERT (Program Evaluation and Review Technique) is a method to provide accurate estimates of project tasks. The PERT estimate techniques provides three different estimates for each task, including the most Pessimistic (P) estimate considering everything goes wrong. It includes the most Optimistic (O) estimate, assuming everything goes right. Finally, it includes the Most Likely (ML) estimate given standard work processes and effort.
Leveraging all three potential estimates, we derive a weighted final estimate for the project work effort. The resulting PERT estimate is calculated as (P + (4xML) + O) / 6. Notice the Most Likely (ML) estimate is weighted 4 times as much as the other two estimates.
Remember the PERT formula and use it to provide estimates when you have a high level of uncertainty.
Note: To be fair, there are other ways to derive the PERT estimate calculation, but this is the one that PMI references.
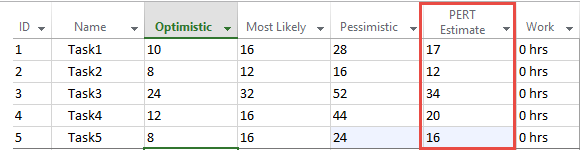
Scenario: We have an uncertain task assigned to a resource. Let’s say the most likely estimate on the task is 16 hours. The best estimate, assuming everything goes right is 10 hours and the worst estimate, assuming everything goes wrong is 28 hours. Leveraging the PERT formula to provide an accurate estimate, the final estimate is 17 hours.
(28 + 16 (4) + 10) / 6 = 17 hours
Notice the final estimate was pulled slightly towards the Pessimistic estimate, but not by much, considering the final estimate to more closely aligned to the given most likely estimate for the task.
Incorporating PERT into Project Professional
Let’s begin configuring PERT within Project Professional to provide a more accurate estimate of our uncertain tasks. Here are the detailed configurations within Project Professional, Soup to Nuts.

Create Task Level Field
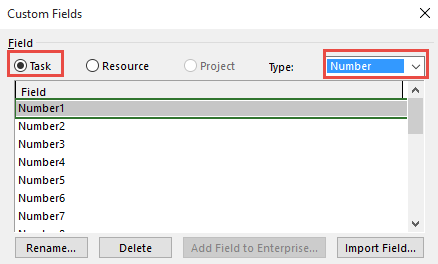
1. Open Project Professional. Within Project Professional, select the Project tab. Within the Project tab, select the Custom Fields button.
 2. Within the Custom Fields window, be sure to select the Tasks type and select the Number format.
 3. Within the Field list, select one of the unused fields. Click the
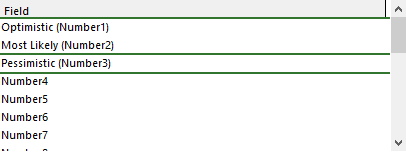
[Rename] button. Rename the task field “Optimistic”.
4. Rename three custom task fields within a Number format for PERT estimates:
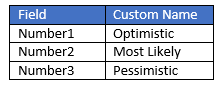
* Other than the field name, you may leave all other field format options set by default.
5. When the PERT estimate fields have been entered, let’s establish the PERT formula.
a. Select a fourth task field and rename the field “PERT Estimate”.
b. Within the task options, select the [Formula] button within the Custom Attributes section.
c. Within the formula prompt, enter the following formula:
([Optimistic] + ([Most Likely] * 4) + [Pessimistic]) / 6
d. Within the Calculation for task and group summary rows, select Rollup: Sum
e. Click [OK] to complete the custom field entry.

Create PERT View
Let’s establish your PERT view for purposed of providing estimates.
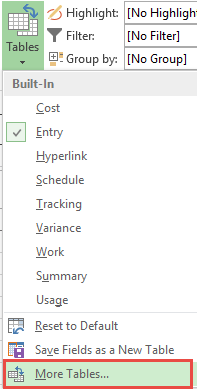
1. Within Project Professional, select the View tab
2. Within the View tab, select the Tables button. Within the Tables, select [More Tables].
 3. Within the More Tables window, select the [New] button to establish a new table.
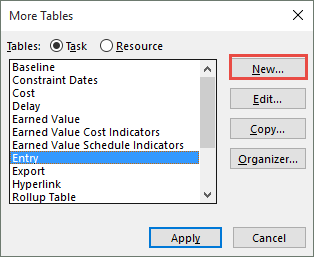
4. Give the table name “PERT Estimate”.
5. Within the Field Name, select the following fields and apply valid Widths.
- ID Width: 6
- Name Width: 15
- Optimistic Width: 15
- Most Likely Width: 15
- Pessimistic Width: 15
- PERT Estimate Width: 15
- Work Width: 10

6. Click [OK] to save the new table.
7. Within the More Tables window, click [Apply]. Ensure the new table is currently displayed.
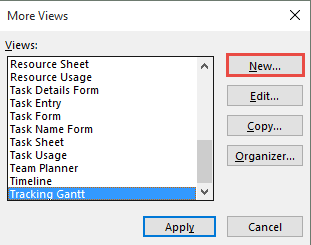
8. Within the Views tab, select the More Views option.
9. Within the More Views window, select [New] button.
10. Within the Define New View window, select Single view and click [OK].
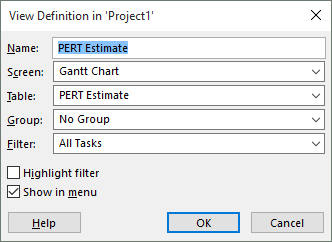
11. Within the View Definition window, enter the following items:
- Name: PERT Estimate
- Screen: Gantt Chart
- Table: PERT Estimate
- Group: No Group
- Filter: All Tasks
- Be sure to Show in Menu
12. Click [OK] to save your new view.
13. Within the More Views window, click Apply.
14. Confirm the display of the PERT Estimates view.
15. Begin entering your tasks and PERT Estimates to validate the calculation within the PERT Estimate field.
16. At the conclusion, you may also enter the PERT Estimate task field into the default Entry table by clicking the standard [Add a new column] option.


